July 28, 2022

TGIFF - Essential Tank Dress

Welcome to this week's TGIFF party! A finish always feels good, doesn't it? If you have a finish to share, link it up so we can all celebrate with you 😊

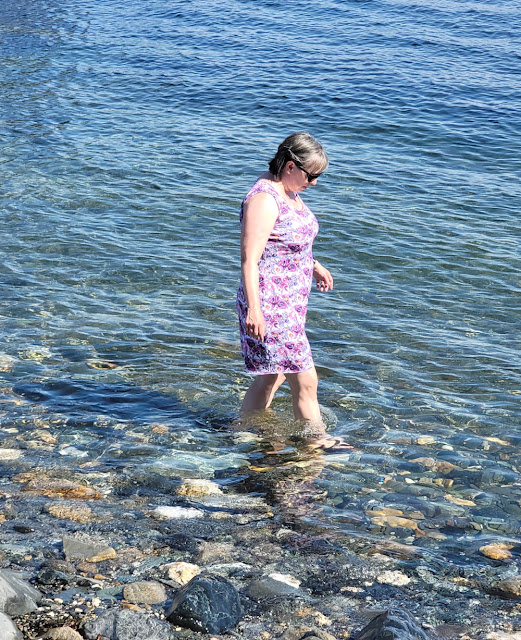
My finish was actually finished a few weeks ago, but I didn't get pictures until this week. It's easier to get pictures of a quilt than of a dress because I don't have to be in the quilt pictures! I have been mostly wearing dresses this summer and this Essential Tank (pattern from Patterns for Pirates) has been on heavy rotation.
Essential Tank dress | DevotedQuilter.com
There are a couple of things I love about this dress, but the biggest one is that I don't have to worry about flashing everyone if there's a breeze! Always a bonus, right?

With this, I have now made almost every view included in the Essential Tank pattern - the top with straight straps and with racerback straps, the maxi dress with front slit and with the back slit and now the above the knee length. The only things I haven't done are the tunic length and the banded bottom on the tops. Not bad for a $10 pattern.

I widened the straps a little because the first couple of things I made with this pattern were just a bit too narrow and my bra showed. I know lots of women don't worry about that, but I prefer to have mine hidden. Being able to accommodate my own preference is one of the great things about making my own clothes!
Essential Tank dress | DevotedQuilter.com
I used an athletic knit from Black Rabbit Fabrics (shout out to them - their shipping times are always crazy fast!) and I love the feel of it. It's a nice weight and it feels nice and cool, which has been wonderful this summer, especially since I do not like the heat at all. Paul and I went to the beach for these pictures and so I could spend some time in the water because it was really hot that day (okay, really hot for Newfoundland, so those of you in more southern climes would laugh at me like I laugh at you when you say it's cold in the winter, lol). This beach isn't good for swimming because there are lots of big rocks just below the surface, but it is good for walking in the water. Isn't it a beautiful spot?
Essential Tank dress | DevotedQuilter.com
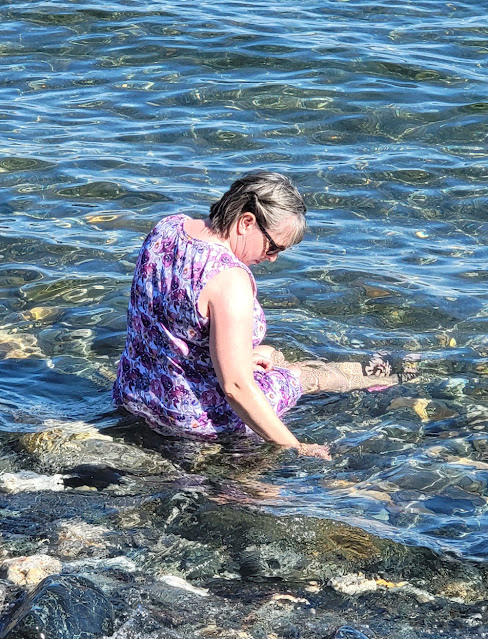
After a while I got tired of walking around, so I just decided to sit on one of those submerged rocks, lol. FYI, the dress dried pretty quickly 😊
Essential Tank dress | DevotedQuilter.com
I used to feel kind of guilty for sewing dresses more than anything else, but after wearing them so often this summer I won't feel guilty anymore. In fact, I feel perfectly justified in sewing up a couple more!

The one complaint I do have about most of the dresses is that they don't have pockets. I've been using a Necessary Clutch Wallet I made back in 2018, but my phone doesn't fit in it, so when I go out without pockets I have to carry my purse and my phone, which gets annoying. Maybe it's time to make a new purse...I really don't like having a large purse, though, so if you have a recommendation for something just slightly larger than the Necessary Clutch Wallet, I'd love to hear it!

And now it's your turn! What have you finished this week? Or finished a while back and finally got around to sharing? Link it up so we can celebrate with you. And be sure to visit a few of the other links to celebrate their finish with them. It's always fun to have lots of people cheering us on!

You are invited to the Inlinkz link party!

Click here to enter

July 18, 2022

2022 Mid-Year Review

The actual mid-point of the year snuck past while I was on a whirlwind trip to Nova Scotia with Nathan, but it's still the middle of the year, so I'm just going to go ahead 😊 Yvonne, of Quilting Jetgirl, is hosting her annual Mid-Year Check In, so you can write up a review of your own goals and share it there, if you're interested.

So, how am I doing with my goals this year? Let's have a look.
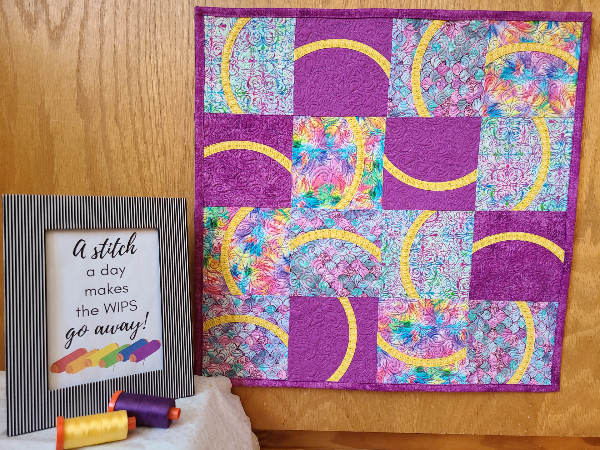
Noodles mini quilt | DevotedQuilter.com
The first Noodles mini quilt I made this year


1. Make more small quilts


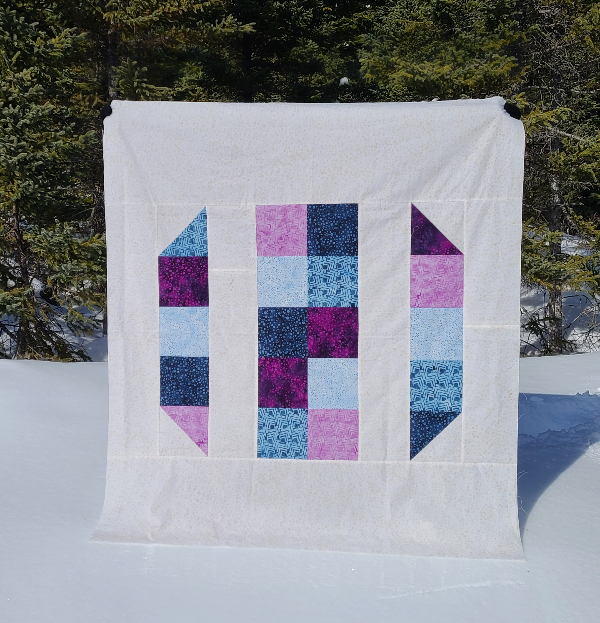
I've been doing pretty well on this one! So far I've made a mini and a table runner with the Ticker Tape Heart block, a Noodles mini (shown above), a Shining Through quilt top, a Formal Garden baby quilt, another Noodles mini, and a super fun Tilted Flowers baby quilt top (it's a new free pattern!). There have been a couple of throw size quilts, too, but they don't fit with the goal, lol.

I'm also currently working on another baby quilt and have another one lined up to be done right after it, so it's safe to say I'm having fun making small quilts. I can even see a bit of space in the batting scraps box, so the plan is working!
Formal Garden baby quilt | DevotedQuilter.com
My Formal Garden baby quilt

2. Learn to sew pants


I haven't tackled this one yet. I have looked at a lot of patterns that would make good shorts, but I haven't convinced myself to make that first attempt. I do need shorts, though...

3. WIPS-B-GONE 2022


I have been doing a lot of thinking about this and I'm excited for it to happen in the fall. I am thinking that I might change the format a bit (60 days instead of 100, to avoid the craziness that is December), so if you have thoughts on that, I'd love to know what you think.
Shining Through quilt pattern | DevotedQuilter.com
Shining Through quilt top - one of many WIPS I will be working on during WIPS-B-GONE

4. The Add Grace QAL


For the second year in a row, I loved sharing 40 days of quilting and devotions leading up to Easter. Also for the second year, I made two quilts...but they're both only tops, not finished quilts. See, I need WIPS-B-GONE as much as anyone!
Add Grace quilt pattern | DevotedQuilter.com

5. More workshops


I love teaching workshops! I have had some guild workshops this year, plus I've hosted two open enrolment ones myself. I've had a blast teaching and sewing along with new friends in all of them. It's amazing to me that I can sew in my living room here in Newfoundland while quilters all over the world are in their own homes, sewing and learning right along with me.

I'd love to meet with your guild or group, so please reach out if you are interested. You can learn more about my workshops here.


It feels good to take a look back and see what I've accomplished so far and to remind myself what I still want to accomplish before the year is out (I'm looking at those pants patterns!). Thanks, Yvonne, for the reminder to check in!

July 12, 2022

Tilted Flowers Quilt Pattern - Summer Scrap Elimination Challenge

This post contains affiliate links, which means I may earn a small commission if you make a purchase after clicking a link, at no extra cost to you.

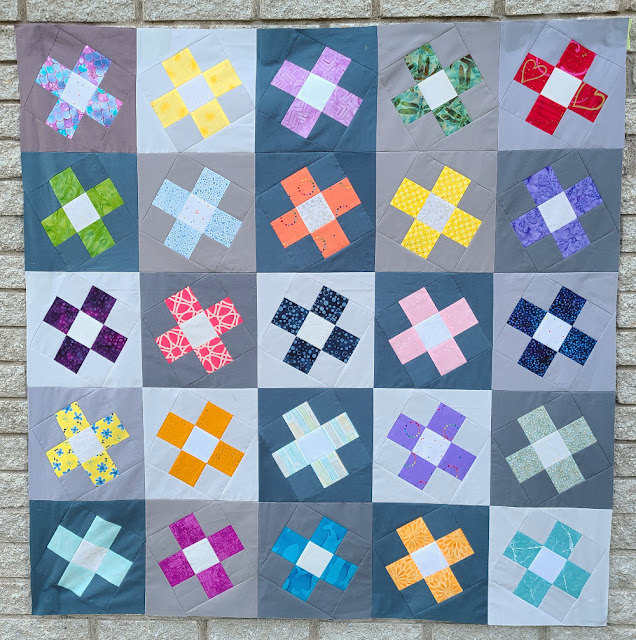
I don't know about you, but I always have an abundance of scraps just begging to be used instead of kept hidden in a box or bag. Not to mention with everything getting so expensive, it's great to use the fabric we already have rather than buying more. With all of that in mind, I jumped at the chance to be part of Swan Sheridan's Summer Scrap Elimination Challenge! Meet Tilted Flowers, my new free baby quilt pattern, designed for this challenge.
Tilted Flowers baby quilt pattern | DevotedQuilter.com

The full Tilted Flowers pattern is here on this post, or you can download the pattern PDF to keep it for later.

Click here to get the Tilted Flowers pattern PDF


Tilted Flowers quilt pattern | DevotedQuilter.com

When I set out to design something for the challenge, the one thing I knew right from the start was that I'd be using a grey background. A couple of years ago, I emptied my giant, overflowing bag of scraps and separated the scraps by colour, storing each colour in a separate shoebox. Well, after making a few quilts with backgrounds made from grey yardage, the box of grey scraps wouldn't close anymore! I knew there were plenty of fairly large pieces in there, perfect for making a scrappy grey background, so that was a given right from the start. 

Of course, even after making this baby quilt top, the box of greys is still full. How is that possible?? When Aiden got a new pair of work boots last week, I considered moving the greys into the box the boots came in but managed to convince myself that the goal is to use the scraps, not to keep moving them into larger and larger boxes. I just need to make more quilts with scrappy grey backgrounds!

I managed to cut everything for this quilt top from my scraps, which felt like a great accomplishment. Of course, like the grey box, none of the other boxes look any emptier for it either.

Let's make a Tilted Flowers baby quilt!


Fabric requirements


Grey solid

Approx. 1 ¼ yard total

White scraps

Approx. ¼ yard total

Bright coloured scraps

25 pieces at least 5" square

Backing

2 ¾ yards

Batting

48" square

Binding

½ yard


Cut


Grey scraps
  • Cut 25 matching sets of
    • 4 2½" squares
    • 2 rectangles 3 ⅝" x 6 ¼" *
White scraps
  • Cut 25 2½" squares
Bright coloured scraps
  • Cut 25 matching sets of 4 2½" squares
* Some of my blocks came out slightly small (less than ⅛" off), which I'm blaming on inconsistent seam allowances. I think you could cut your rectangles slightly larger (maybe ¼" in both length and width) to give yourself a little wiggle room for error, but I haven't actually tried it.

I used my Accuquilt Go to cut all of the 2½" squares. The die cuts 4 squares, plus you can layer the fabrics to cut even more at a time, making it super quick to cut everything I needed. I cut all the bright colours first, then switched to the whites. I forgot I only needed one white square for each block, though, so I had probably cut 15 sets of 4 white squares before I realized my mistake 😂 Oh well, I'll find another use for those leftover squares.

Make the blocks


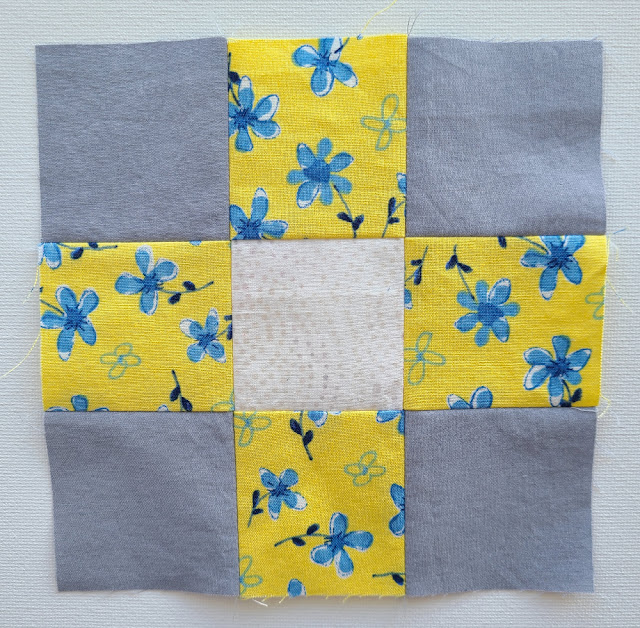
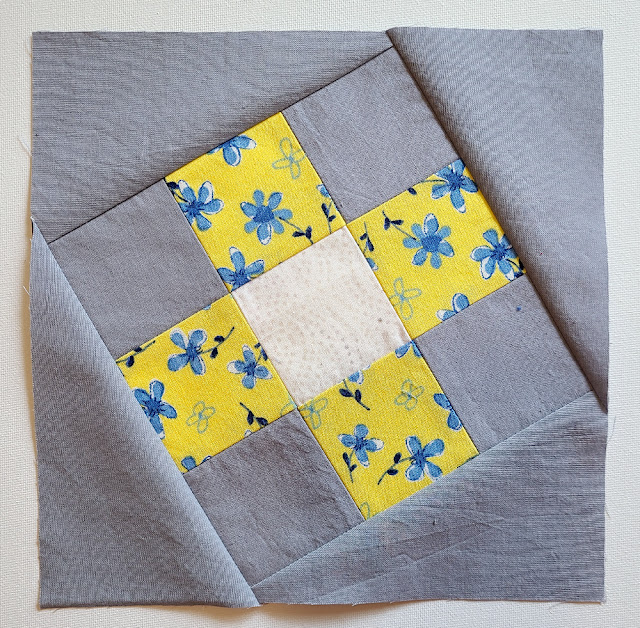
1. Using 1 white square, 4 matching grey squares and 4 matching bright coloured squares, sew a nine patch block as shown. I pressed the seams between squares towards the bright coloured scraps and then pressed the seams between rows open. Repeat to make 25 nine patch blocks.
Tilted Flowers baby quilt pattern | DevotedQuilter.com
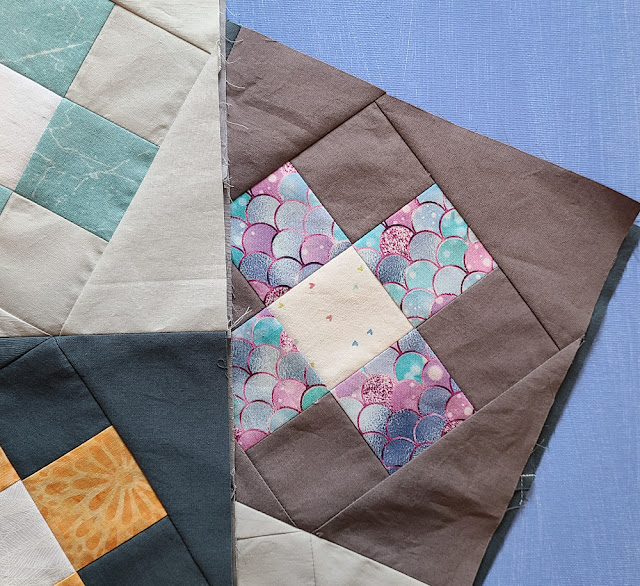
2. Arrange the nine patch blocks in a 5 x 5 layout. Once you are happy with the colour distribution, label each block with a number (1-25) so you know where in the quilt it belongs. This is an important step because all even numbered blocks will tilt to the left and odd numbered blocks will tilt to the right, so you want to be sure you like the colour distribution before you start adding the triangles that make the flowers tilt.

3. If you are using solids or batiks, which don't have a wrong side, cut all of your grey rectangles diagonally as shown here:
If your fabric does have a wrong side, cut the grey rectangles for even numbered blocks as shown above, but the rectangles for the odd numbered blocks need to be cut in the opposite direction, as shown here:

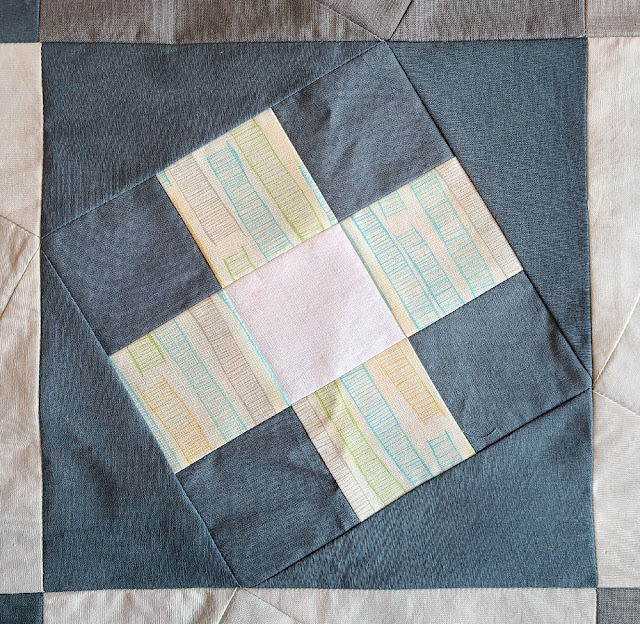
4. Stitch two matching grey triangles to opposite sides of an even numbered nine patch block. As arranged here, the triangles will make the flower tilt to the left. 

Tilted Flowers quilt pattern | DevotedQuilter.com
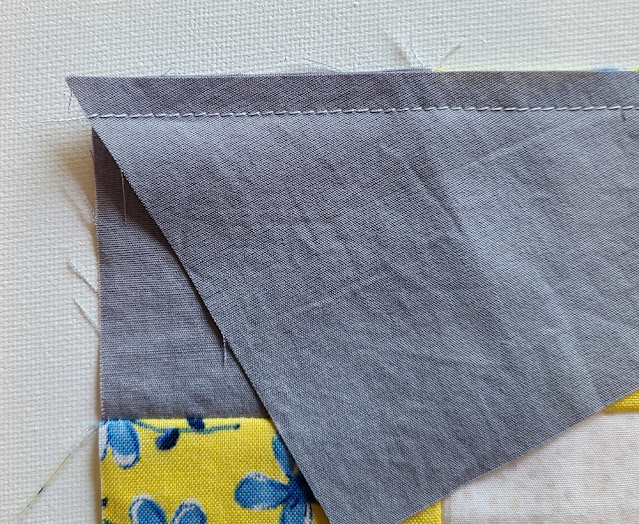
The ends of the triangles will stick out past the edges of the block - this is okay! I found it easiest to line things up correctly if I started stitching at the wider end of the triangle and had the triangle positioned so that the seam started exactly where the triangle meets the edge of the block, as you see in this picture. 
Tilted Flowers quilt pattern | DevotedQuilter.com
Press the seams towards the triangles.

5. Stitch two more grey triangles to the remaining two sides of the nine patch block. Again, press the seams towards the triangles. Repeat with all of the even numbered blocks.
Tilted Flowers quilt pattern | DevotedQuilter.com
6. Arrange the triangles as shown in this block for the odd numbered blocks to make the flowers tilt to the right and repeat steps 4 and 5 with all of the odd numbered blocks.
Tilted Flowers quilt pattern | DevotedQuilter.com
7. Trim the blocks to 8 ½" square, if necessary.

Assemble the quilt top


1. Arrange the blocks in the same 5 x 5 layout from earlier. Stitch the blocks together into rows, pressing the seams open. The finished rows should measure 8 ½" x 40 ½".

2. Stitch the rows together to complete the 40 ½" x 40 ½" quilt top. Press the seams open.

Finish the quilt


1. Cut the backing fabric into two 48" lengths and stitch them together along a long side. 
2. Trim as necessary to make a backing that measures approx. 48" square.
3. Layer the quilt top, batting and backing. Baste together, then quilt as desired. Normally this is where I'd tell you how I quilted mine, but I haven't yet, so I can't do that!
4. Trim the batting and backing even with the quilt top. 
5.  Join the binding fabric 2 ¼" x WOF strips into one continuous strip. Mitering corners and joining ends, machine stitch binding to quilt, then finish with your preferred method.

Tilted Flowers quilt pattern | DevotedQuilter.com


Get the Tilted Flowers pattern


Remember, if you want the pattern as a PDF, enter your email address on this form and a link to download it will be sent right to your inbox!

Tilted Flowers quilt pattern | DevotedQuilter.com

Need more scrap busting inspiration? We've got you covered!


Be sure to check out the rest of the Summer Scrap Elimination Challenge posts!

Swan Amity - EVERY THURSDAY 6/23 - 7/28:    www.SwanAmity.com/blog

6/23:  Debbie Wendty  https://debbiewendt.com/

6/30:  Tamarinis tamarinis.typepad.com

          Shout for Joy  https://shout4joy-shouting.blogspot.com/

7/7:    Masterpiece Quilting  www.masterpiecequilting.blogspot.com

          Meg's Choice Patterns  https://megschoicepatterns.blogspot.com/

7/14:  Devoted Quilter  https://www.devotedquilter.com (that's me!)

          Orange Blossom Quilt  https://orangeblossomquilt.com/blog

7/21:  Dragonflys Quilt Shop  www.dragonflysquiltshop.com

          Patchwork Breeze  https://patchworkbreeze.com

7/28:  Duck Creek Mountain Quilting  https://www.duckcreekmountainquilting.com/