This post contains affiliate links, which means I may earn a small commission if you make a purchase after clicking a link, at no extra cost to you.
I don't know about you, but I always have an abundance of scraps just begging to be used instead of kept hidden in a box or bag. Not to mention with everything getting so expensive, it's great to use the fabric we already have rather than buying more. With all of that in mind, I jumped at the chance to be part of
Swan Sheridan's Summer Scrap Elimination Challenge! Meet
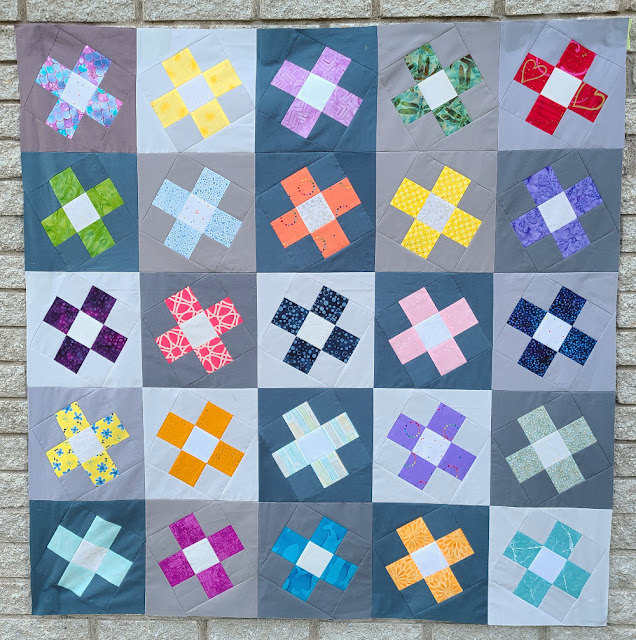
Tilted Flowers, my new free baby quilt pattern, designed for this challenge.
When I set out to design something for the challenge, the one thing I knew right from the start was that I'd be using a grey background. A couple of years ago, I emptied my giant, overflowing bag of scraps and separated the scraps by colour, storing each colour in a separate shoebox. Well, after making a few quilts with backgrounds made from grey yardage, the box of grey scraps wouldn't close anymore! I knew there were plenty of fairly large pieces in there, perfect for making a scrappy grey background, so that was a given right from the start.
Of course, even after making this baby quilt top, the box of greys is still full. How is that possible?? When Aiden got a new pair of work boots last week, I considered moving the greys into the box the boots came in but managed to convince myself that the goal is to use the scraps, not to keep moving them into larger and larger boxes. I just need to make more quilts with scrappy grey backgrounds!
I managed to cut everything for this quilt top from my scraps, which felt like a great accomplishment. Of course, like the grey box, none of the other boxes look any emptier for it either.
Let's make a Tilted Flowers baby quilt!
Fabric requirements
|
Grey solid
|
Approx. 1 ¼ yard total
|
|
White scraps
|
Approx. ¼ yard total
|
|
Bright coloured scraps
|
25 pieces at least 5" square
|
|
Backing
|
2 ¾ yards
|
|
Batting
|
48" square
|
|
Binding
|
½ yard
|
Cut
Grey scraps
- Cut 25 matching sets of
- 4 2½" squares
- 2 rectangles 3 ⅝" x 6 ¼" *
White scraps
Bright coloured scraps
- Cut 25 matching sets of 4 2½" squares
* Some of my blocks came out slightly small (less than ⅛" off), which I'm blaming on inconsistent seam allowances. I think you could cut your rectangles slightly larger (maybe ¼" in both length and width) to give yourself a little wiggle room for error, but I haven't actually tried it.
I used my
Accuquilt Go to cut all of the 2½" squares. The die cuts 4 squares, plus you can layer the fabrics to cut even more at a time, making it super quick to cut everything I needed. I cut all the bright colours first, then switched to the whites. I forgot I only needed one white square for each block, though, so I had probably cut 15 sets of 4 white squares before I realized my mistake 😂 Oh well, I'll find another use for those leftover squares.
Make the blocks
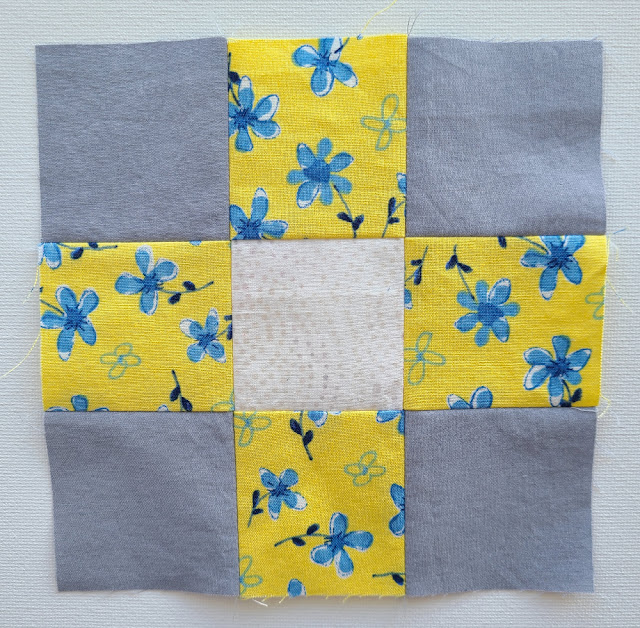
1. Using 1 white square, 4 matching grey squares and 4 matching bright coloured squares, sew a nine patch block as shown. I pressed the seams between squares towards the bright coloured scraps and then pressed the seams between rows open. Repeat to make 25 nine patch blocks.
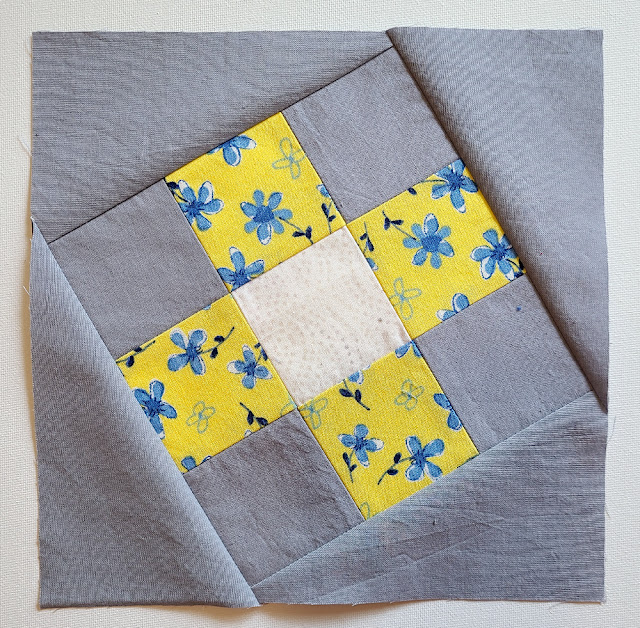
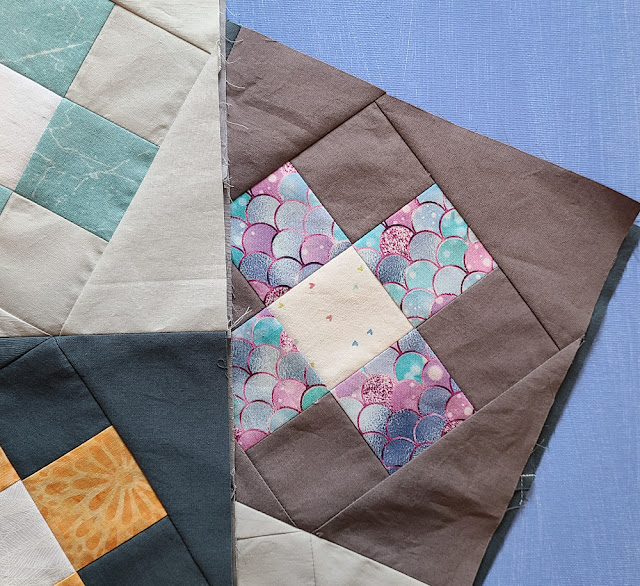
2. Arrange the nine patch blocks in a 5 x 5 layout. Once you are happy with the colour distribution, label each block with a number (1-25) so you know where in the quilt it belongs. This is an important step because all even numbered blocks will tilt to the left and odd numbered blocks will tilt to the right, so you want to be sure you like the colour distribution before you start adding the triangles that make the flowers tilt.
3. If you are using solids or batiks, which don't have a wrong side, cut all of your grey rectangles diagonally as shown here:
If your fabric
does have a wrong side, cut the grey rectangles for even numbered blocks as shown above, but the rectangles for the odd numbered blocks need to be cut in the opposite direction, as shown here:
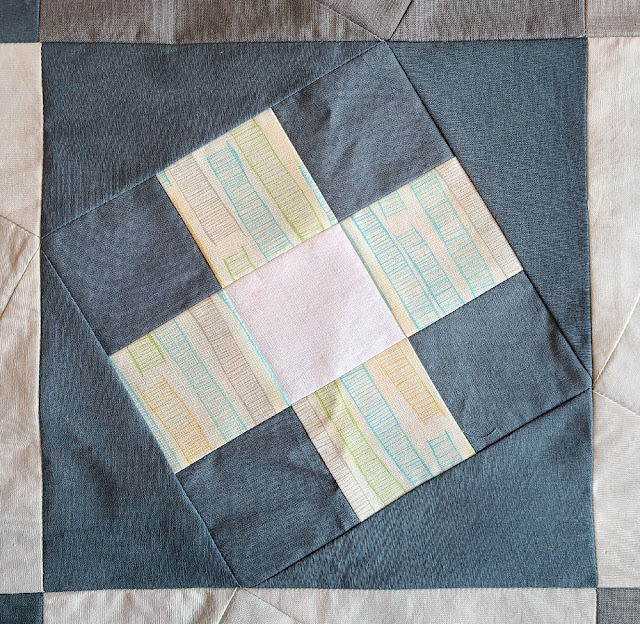
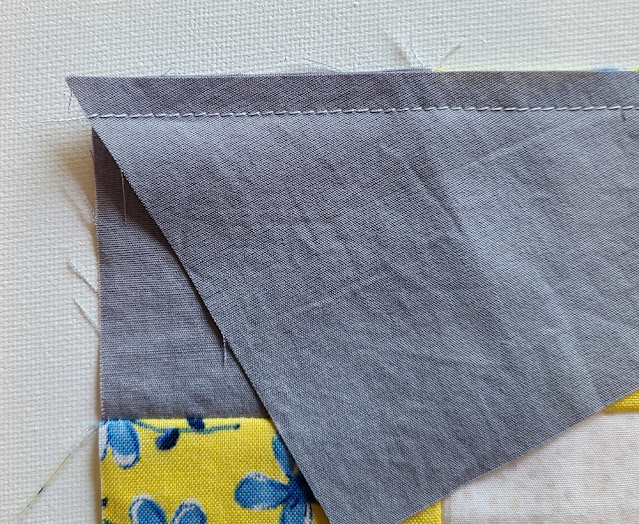
4. Stitch two matching grey triangles to opposite sides of an even numbered nine patch block. As arranged here, the triangles will make the flower tilt to the left.
The ends of the triangles will stick out past the edges of the block - this is okay! I found it easiest to line things up correctly if I started stitching at the wider end of the triangle and had the triangle positioned so that the seam started exactly where the triangle meets the edge of the block, as you see in this picture.
Press the seams towards the triangles.
5. Stitch two more grey triangles to the remaining two sides of the nine patch block. Again, press the seams towards the triangles. Repeat with all of the even numbered blocks.
6. Arrange the triangles as shown in this block for the odd numbered blocks to make the flowers tilt to the right and repeat steps 4 and 5 with all of the odd numbered blocks.
7. Trim the blocks to 8 ½" square, if necessary.
Assemble the quilt top
1. Arrange the blocks in the same 5 x 5 layout from earlier. Stitch the blocks together into rows, pressing the seams open. The finished rows should measure 8 ½" x 40 ½".
2. Stitch the rows together to complete the 40 ½" x 40 ½" quilt top. Press the seams open.
Finish the quilt
1. Cut the backing fabric into two 48" lengths and stitch them together along a long side.
2. Trim as necessary to make a backing that measures approx. 48" square.
3. Layer the quilt top, batting and backing. Baste together, then quilt as desired. Normally this is where I'd tell you how I quilted mine, but I haven't yet, so I can't do that!
4. Trim the batting and backing even with the quilt top.
5. Join the binding fabric 2 ¼" x WOF strips into one continuous strip. Mitering corners and joining ends, machine stitch binding to quilt, then finish with your preferred method.
Get the Tilted Flowers pattern
Remember, if you want the pattern as a PDF, enter your email address
on this form and a link to download it will be sent right to your inbox!
Need more scrap busting inspiration? We've got you covered!
Be sure to check out the rest of the Summer Scrap Elimination Challenge posts!







Fun design, Leanne! It would be fun to thoughtfully place the setting triangles so that the diamonds that are formed pop out as a secondary design. :)
ReplyDeleteWhat a fun way to use up scraps! Thanks for linking up to TGIFF
ReplyDeleteThis is really sweet and I can see some fun colour opportunities--using all yellow centre squares to make them even more flower like, or all flowers the same colour.
ReplyDeleteThank you Leanne. I will start curating scraps to create more quilts for our local guild NICU initiative.
ReplyDelete