I was pretty tickled when Leanne asked me to do a guest post on her blog about yoga poses to help quilters. Leanne and I go way back to the New Quilt Bloggers group of 2015, so we've known each other for some time. We've come sooo close to meeting up in person, but never quite have made it happen. Yet.
Yoga has really caught on with the past 10-15 years in the West, so I'm sure that many of you have tried a class, whether in person or online with YouTube. Maybe you think, nope, no can do, much too stiff, I can't get down on the floor, I'm not flexible, I'm not into that chanting stuff, yada yada.
Well, I'm here to hopefully show you that you can press 'mute' on that voice that is saying all of those negative anti-productive sentiments, and try some Yin yoga. No, we won't be wrapping our legs behind our head but we will be doing some deep tugs on our connective tissues. Briefly, connective tissues are ligaments, tendons, the white string-like fibres you see running through a package of a meat cut, the opaque white film you see encasing certain cuts, whether those cuts were muscle or organs, the opaque white film behind a pack of ribs. We have all of that 'white stuff' inside of us and if we don't gently but steadily tug on it, through pressure as in deep tissue massage or myofascial release, or Yin, it tightens up, and yep, we get really stiff. The great news? No matter whether you are 10, 30 or 70 or 80 or whatever age, you can become less stiff! Our bodies are amazing. AHH-mazing.
As for 'that chanting stuff', yoga actually was developed thousands of years ago (you read that right, as in 5000) in order to quiet the mind, so it is originally a spiritual practice, using the body to get into the mind. Before you leave, though, wait! You can easily and simply just focus on the body aspect. Who knows, maybe you will find you start to enjoy that inner stillness and quiet, especially in this noisy loud world of ours!
As quilters, we tend to sit for extended periods of time at our machines, head bent, shoulders rounded. Heck, I know many who purposely set their pressing and even cutting/trimming stations up so that they don't even have to stand up or barely move, maybe just roll the chair over, to do all parts of the quilting process. The first thing you can do is to make one or both of those two stations somewhere in your sewing space that forces you to stand up walk over, and press, or cut. Movement is so important.
Here are just a few poses from Yin yoga that you may like to try as a break between long sessions of quilting, before you begin to quilt, or after. Some of these also can help with sleep troubles by doing them just before you go to bed! Use the timer function on your phone to time the minutes for these. Key word is relax into the pose; never force, no pulling, muscles are soft, and no pain at all. Back off, or modify or do not do the pose if there is pain. Discomfort? Good! As long as it is manageable and you can slowly and calmly breathe!
Shoulder stretch: Eagle Arms
You don't even have to get out of your chair for this! Set your right elbow inside your left elbow eye. See if you can continue twisting your arms around each other, bringing your palms together in prayer. If you can't go that far, fake it: grab your pinky with your thumb. Try to keep your wrists straight, not bent, pointing your fingers up to the ceiling. Enjoy the pull across your shoulder blades for a minute, over several slow steady breaths, evening out your inhales and exhales. Then, if you like, eagles fly, so slowly and mindfully raise your arms up to the ceiling, trying to keep the shoulders down. Hold arms up for about a minute. To come out, bring your arms down slowly, unwind slowly, enjoying the ahhhh! feeling of release, and press your palms out to the side, straightening your arms, as if pushing back imaginary walls that are closing in. Then gently shake out your arms. Repeat, setting the left elbow inside the right.
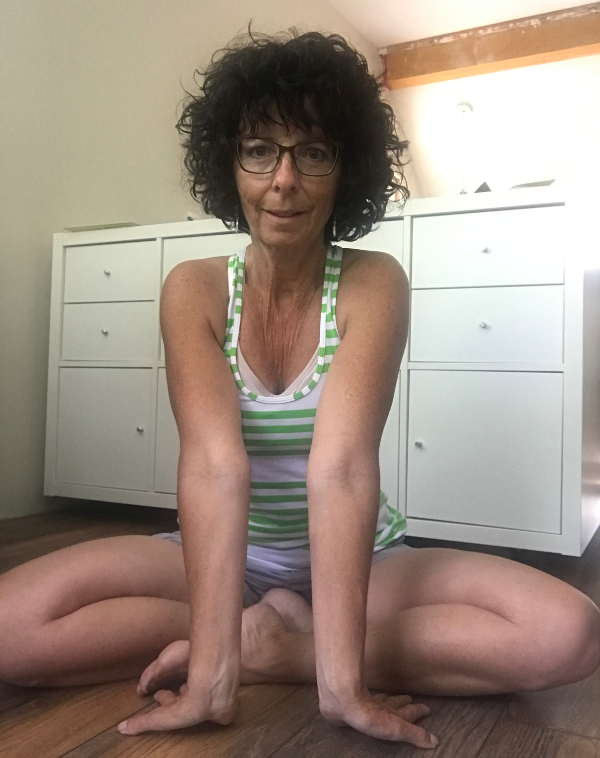
Outer-rotating of hips: Butterfly Pose
If you have disc issues, do not round but lean from the hips, keeping your tummy pulled in to protect your low back. Hold for 3 minutes, allowing your head to dangle if it's okay for your neck. This will give your neck a lovely stretch. If you get close to the floor you can rest your head on a block or a cushion, or your feet ha! Come out very slowly. Lean back on your hands and do what feels natural: stretch out the legs and just be still and enjoy the rebound of the pose, or bend the legs and do windshield wipers a few times. Doing this pose reclined before going to bed can help with sleep issues.
Wrist stretches
These could even be done while in Butterfly pose.
Stretch 1: Hold out your arms with the palms up as if someone is giving you a stack of freshly folded quilts. Drop your fingertips towards the floor (or low table, if you are doing this while seated on the couch or a chair). Bring them in a little closer to your groin and then, keeping the elbows as straight as possible, send the palms towards the floor. Wrists are fine joints, so we only hold this a minute and we are very gentle with our wrists. This is helpful for carpal tunnel syndrome. Come out slowly, making fists, by folding in each finger, thumb on top and squeeze gently. Rotate the wrists each way 2-3 times and shake it out.
Stretch 2: Hold out your arms with the palms down. Drop your fingertips to the floor, this time sending the backs of your hands towards the floor. Easy does it, again trying to keep your elbows straight. Hold for one minute. Come out as before.
Backbends - Sphinx Pose
Lie down on the floor. You know, I had a yoga student once who, through a friend who was already in my classes, told me she wouldn't come to yoga, much as she wanted to, because she couldn't get up and down off the floor easily. Well most of Yin is ON the floor, so I said to tell her, sit at the back if you like, and I bet you will find that you can do this, and I can help you get up when you need to, at the end of the class. She came, because she was avoiding getting a knee replacement, and six or maybe it's seven years later now, she still hasn't had a knee replacement, and she's finding it a lot easier to get up and down off the floor. And it helps with her sailing apparently as well! You could try this one on your bed I suppose, though it isn't the firm support we actually really need.
This is 'kid watching TV pose' I tell my students. Prop yourself up on your forearms, with your elbows stacked beneath your shoulders. Your palms can be on the floor, or in prayer, or you can clasp opposite elbows. This pose can help with slipped or herniated disc issues, but do not stay if there is any kind of pain whatsoever. Try to relax your butt and leg muscles so the work transfers to your low back. Hold for 3 minutes or longer. If you want a little more intensity, trying bending the legs at the knees so your feet are up in the hair and hold there. It can be wonderful after many hours bent over a machine or a cutting table, or basting a quilt. To come out, slowly, slowly lie back down, turn your head to one side and draw up that same leg, so you're lying with one bent and one straight. If you crave some movement, come down but place your forehead on your stacked hands, and bend both of your legs up into the air, waving them gently back and forth in windshield wipers.
If that pose is too intense, try Baby Cobra pose. It is much the same, but you place your hands under your shoulder heads, so only your head, shoulder heads, and collar bones are off the floor. The ribs are still on the floor so the backbend is not as intense. As in Sphinx pose, try to relax your butt and legs.
Spinal Twist
We naturally twist our spine throughout the day when we feel we need to release tension. That is exactly what a twist does! More than that, though, is the rejuvenation that occurs when we twist, and if we hold that twist with our muscles relaxed, we can further deepen the benefits. You can do this seated in your chair or on the floor. It is a good one to do before bed to help you sleep. If on the floor, lie down with your arms in a T position, and bend both knees. Slowly drop them over to the right. Try to keep your left shoulder in contact with the floor. You can put a rolled up quilt or a pillow under your knees to help keep that shoulder down. If your neck is okay, turn your head and look to the left. If you want a deeper twist, straighten out the bottom leg. Hold this for 2-3 minutes breathing slowly and deeply. Slowly unwind and then repeat on the other side. When you've finished that side, you can hug your knees into your chest. If you're doing this in your chair, hold the pose and don't pull yourself around.
If these poses interest you and you'd like to try a one-hour sequence of yin poses, I have been teaching on Instagram @mmmquilts on Tuesday and Thursday mornings at 6:30-7:30 EST. I uploaded several of the flows to my YouTube channel Sandra Walker. You also can find several more poses and more details about these under the tab Yoga Posts and Recipe Links on my blog. And, be sure to check out Bernie Clark's website, yinyoga.com for a wealth of information, articles and links to his YouTube channel as well. I did my first teacher training using his book as our text, and recently did a second teacher training with him as my teacher.


Very interesting. I tried the first one. I had to do it "backwards" i.e. switching arms - to have any success.
ReplyDeleteGreat post. I always forget to stretch. LOL
ReplyDeleteGreat post. I need more stretching. Thanks for sharing.
ReplyDeleteThis is so great. Thank you Leanne and Sandra for sharing this.
ReplyDeleteWhat a great post! Thanks for all the yoga poses....I especially love butterfly with the hand poses; new ones for me!
ReplyDeleteLove this! I'm bookmarking it.
ReplyDeleteI love soft movements, and these one are great! Thanks for sharing 😊
ReplyDeleteThanks for asking Sandra to do a guest post, Leanne! Goodness knows we quilters seriously need to stretch after some sewing time. Great yoga tutorial, Sandra!
ReplyDelete